R-STUDS Metric Threaded Rods - Steel Class A2, Flat Head
A2 stainless steel threaded rod for outdoor and damp conditions


Features and benefits
- Threaded rod made of A2 stainless steel for outdoor use and in damp conditions
- High-performance bonded anchors offer high load-bearing capacities
- Can be post-installed through fixture in some cases. (Consult technical advisory service)
- Flat head for quick manual installation without a setting tool
- Necessary for use in copy-eco system - reinforcement of suspension rod in large-panel construction systems
Product information
Size |
Product Code |
Anchor |
Fixture |
|||||
Diameter |
Length |
Max. thickness tfix for: |
Hole diameter |
Max. thickness tfix for: |
||||
d |
L |
hnom, 6d |
hnom, 12d |
df |
hnom,min |
hnom, 12d |
||
[mm] |
[mm] |
[mm] |
[mm] |
[mm] |
[mm] |
[mm] |
||
M10 |
R-STUDS-10330-A2FL |
10 |
330 |
258 |
198 |
12 |
248 |
198 |
M12 |
R-STUDS-12140A2FL |
12 |
140 |
53 |
- |
14 |
45 |
- |
R-STUDS-12200-A2FL |
12 |
200 |
113 |
41 |
14 |
105 |
41 |
|
R-STUDS-12220-A2FL |
12 |
220 |
133 |
61 |
14 |
125 |
61 |
|
R-STUDS-12250-A2FL |
12 |
250 |
163 |
91 |
14 |
155 |
91 |
|
R-STUDS-12260-A2FL |
12 |
260 |
173 |
101 |
14 |
165 |
101 |
|
R-STUDS-12280-A2FL |
12 |
280 |
193 |
121 |
14 |
185 |
121 |
|
R-STUDS-12330-A2FL |
12 |
330 |
243 |
171 |
14 |
235 |
171 |
|
R-STUDS-12350-A2FL |
12 |
350 |
263 |
191 |
14 |
255 |
191 |
|
R-STUDS-12380-A2FL |
12 |
380 |
293 |
221 |
14 |
285 |
221 |
|
R-STUDS-12400-A2FL |
12 |
400 |
313 |
241 |
14 |
305 |
241 |
|
R-STUDS-12440-A2FL |
12 |
440 |
353 |
281 |
14 |
345 |
281 |
|
R-STUDS-12490-A2FL |
12 |
490 |
403 |
331 |
14 |
395 |
331 |
|
R-STUDS-12500-A2FL |
12 |
500 |
413 |
341 |
14 |
405 |
341 |
|
R-STUDS-12550-A2FL |
12 |
550 |
463 |
391 |
14 |
455 |
391 |
|
Applications
- Fastening with bonded anchors
- Supports
- Barriers
- Racking systems
- Consoles
- Railings
- Window elements
- Scaffolding
- Heavy machinery
- Facades
- Copy-eco systems
- Cable trays
- Curtain walling
- Formwork support systems
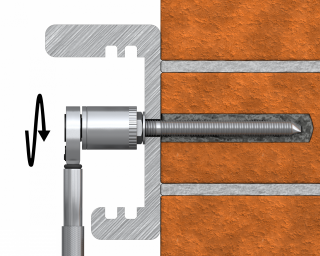
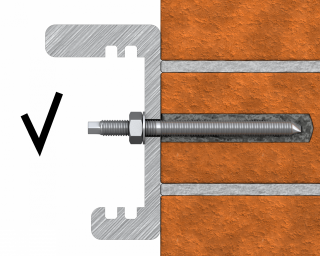
Installation guide
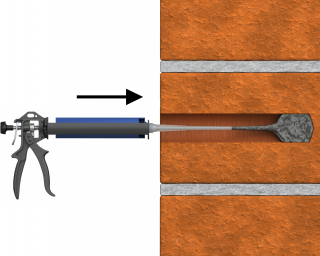
- Drill hole to the required diameter and depth for stud size being used.
- Clean the hole thoroughly with hand pump and hole brush
- If required, insert the mesh sleeve into position
- Fill hole with the required resin to the recommended fill level. (Follow the relevant instructions for the resin product)
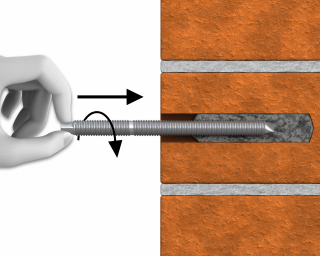
- Insert the threaded stud slowly and with a slight twisting motion, until the required embedment depth is reached
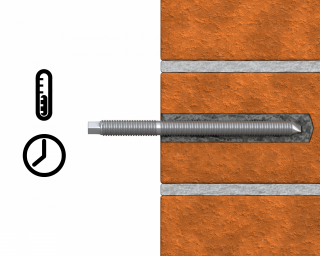
- Leave undisturbed until curing time of resin has elapsed
- Attach fixture and tighten the nut to the required installation torque